My first WP Rest API experiment – code example
Expert
I have just made my first experiments with WordPress Rest API. This is a really simple use case where I pull content from this blog to the frontpage of my portfolio site.
First let us tell where the content goes. Create a JavaScript file to you theme js folder and name it whatever you want. I named mine rest-frontpage.js. Then enqueue script in your functions.php. We have div in our HTML with ID ‘juhablog-posts-container’. That is where we want to put our content. So let us start by making it a variable.
var blogPostsContainer = document.getElementById("juhablog-posts-container");
Then we can check little bit how API request works. First create new XMLHttpRequest as a variable. I will call mine xiongRequest. Because we want to get content from another WordPress site our method is GET. All WordPress Rest API calls starts with http://yourdomain/wp-json/wp/v2/. After this you will give parameters to tell API what you want. In this case I want last 3 blog posts, so I type posts?per_page=3. Different parameters can be found at Rest API documentation here.
var xiongRequest = new XMLHttpRequest();
    xiongRequest.open('GET', 'http://juha.blog/wp-json/wp/v2/posts?per_page=3');
Next we will need to wrap our call to function. I will use jQuery to check document is loaded before we execute this function. We will also wrap function inside if statement so it only executes if ‘juhablog-posts-container’ exist in DOM. This way it will only run when we are at frontpage of my site. Inside the function we will do another if statement to check what kind of response we get from server. Only if we don’t get an error we will parse data to json. Notice that responseText is class by WP Rest API so that name you cant’s change. Just for test purposes let us log data to console. Remember to also send your request (last part in this snippet).
var blogPostsContainer = document.getElementById("juhablog-posts-container");

if (blogPostsContainer) {
  jQuery(document).ready(function() {
    var xiongRequest = new XMLHttpRequest();
    xiongRequest.open('GET', 'http://juha.blog/wp-json/wp/v2/posts?per_page=3');
    xiongRequest.onload = function() {
      if (xiongRequest.status >= 200 && xiongRequest.status < 400) {
        var data = JSON.parse(xiongRequest.responseText);
        console.log(data);
        createHTML(data);

      } else {
        console.log("We connected to the server, but it returned an error.");
      }
    };

    xiongRequest.onerror = function() {
      console.log("Connection error");
    };

    xiongRequest.send();
  });
}
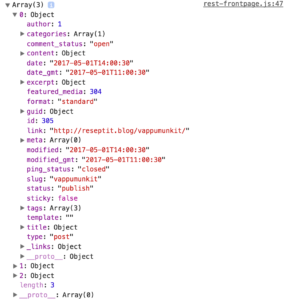
Check you Chrome console that you get some posts. It should look something like this. Here you can also check all the data request give you and pick what to display.

Then let’s display our data and create some html. We will create function createHTML(postsData) and call it in our earlier function and give it our data variable there. In earliar function replace console.log(data) with createHTML(data). In this new createHTML function we will create a for loop and use classic i variable to tell which objects data we are pulling. i Will start at zero and it will be added one each time loop runs by using i++. We will also tell loop to run as long as i is less than postdata length (number of post objects we receive). In variable xiongHTMLstring we will add together html and our data pieces using + in between and wrapping our html in single quotes. Last thing is to add this variable content to innerHTML of our div ‘juhablog_posts_container’ we created at beginning. Final code should look like this.
//JUHA.BLOG
var blogPostsContainer = document.getElementById("juhablog-posts-container");

if (blogPostsContainer) {
  jQuery(document).ready(function() {
    var xiongRequest = new XMLHttpRequest();
    xiongRequest.open('GET', 'http://juha.blog/wp-json/wp/v2/posts?per_page=3');
    xiongRequest.onload = function() {
      if (xiongRequest.status >= 200 && xiongRequest.status < 400) {
        var data = JSON.parse(xiongRequest.responseText);
        console.log(data);
        createHTML(data);

      } else {
        console.log("We connected to the server, but it returned an error.");
      }
    };

    xiongRequest.onerror = function() {
      console.log("Connection error");
    };

    xiongRequest.send();
  });
}

function createHTML(postsData) {
  var xiongHTMLString = '';
  for (i = 0; i < postsData.length; i++) {
    xiongHTMLString += '<a target="_blank" href="' + postsData[i].link + '"><div class="juhablock linkblock">' +'<h3>' + postsData[i].title.rendered + '</h3><p class="blog-label"><i class="fa fa-wordpress"></i> Juha.Blog</p></div></a>';

  }
  blogPostsContainer.innerHTML = xiongHTMLString;
}