Create settings to WP Customizer
Advanced
Creating a setting to customizer is impressive, but surprisingly easy to do. There is four pieces of code you need. First one creates a section to customizer where you can place your settings. Second one creates a database column to store your setting. Third one creates a field to put your setting and last one calls this settings value from database to your template.
First create a file customizer.php (name can be anything) and place it where ever you keep your functions. For most people it’s folder called inc. I usually call folder functions. Then include it to your functions.php like this.
//Including customizer functions
require_once( __DIR__ . '/functions/customizer.php');
Then we start working with our customizer.php. First create a customize_register function and all our customizer code comes inside this.
//This functions stores our customizer settings
function xiong_customize_register($wp_customize){

	//Your code comes here

}

add_action('customize_register', 'xiong_customize_register' );
Then create a sectiong like this. In this example I’m creating a section called Colors.
//Create a section to customizer
$wp_customize->add_section('xiong_color_theme_section', array (
	'title' => 'Colors', //Label of your section
	'priority' => 30 //Position in customizer menu

));
Then we need a place to store our setting in database. You can create it like this. header_bg_color is the ID of your setting in this example.
//Create a setting to database called header_bg_color
$wp_customize->add_setting('header_bg_color', array(
	'default' => '#000', //default value
	'transport' => 'refresh'//tells customizer to refresh page after change
));
Next step is to create an input field to customizer so we can change our setting. WordPress has classes ready for these. Text control is WP_Customize_Control, Image control is WP_Customize_Image_Control and color picker comes with WP_Customize_Color_Control. There are several others too but we will use color control in this example. Check rest here.
//Create input field and save value to previosly created DB col
$wp_customize->add_control(new WP_Customize_Color_Control($wp_customize, 'theme_colors', array (
	'label' 	=> 'Header color', //Label for this field
	'section'	=> 'xiong_color_theme_section', //your section ID
	'settings'	=> 'header_bg_color' //your database ID

) ));
Now. We can go and change this setting and it will store to database. But it to make effect we need to call it from our template. In this example it will be header background color. Magic hook is get_theme_mod. You can use it in template files, but in this case I will place use it to place some CSS to header using wp_head hook. This will be in same file as my other customizer stuff, but it is a new function. Setting value can be anything and can be called any place in your template. Just write echo get_theme_mod(‘your_setting_id’) and it will return the value from database.
//Get saved values from customizer to theme CSS using get_theme_mod
function xiong_head() {
?>
<style type="text/css">
	.xiong-hero {
		background: <?php echo get_theme_mod('header_bg_color', '#000' );?> !important;
	}
</style>
<?php


}


add_action('wp_head', 'xiong_head' );
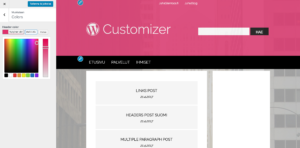
End result of this example looks like this.